
Cart is empty
Warning
Cookies are used on this site to provide the best user experience. If you continue, we assume that you agree to receive cookies from this site.
Point of Purchase Retail Store Fixtures, merchandising displays, sign holders and frames, hang tabs, display peg hooks, ceiling hanging, display construction and much more...


Categories

Services & References
History of the Clip Strip® Video
Click here to watch the video of the amazing story about how, when & why the Clip Strip® Brand Merchandising Strip was invented
How do I load a Clip Strip®?
The easiest way to load a Clip Strip® is to attach the S-hook to the top of the strip and hang it in front of the person loading. Begin loading it from the bottom up.
In some cases, all 12 positions on a conventional strip will be used and so, the loading begins with the very bottom mounting position and proceeds up to the next one and so on… until the top one is loaded.
If it has been determined that only 6 packages will be loaded onto the strip (package may be too bulky for 12), you load the first package onto the 2nd position up from the bottom and then proceed to load onto every other mounting position. (This is the case illustrated below).
Many die-cut strips employ an “interlocking fingers” design to support and display merchandise. Loading these strips is easy. Figures 1 & 2 illustrate how to load each mounting station. The procedure is then, repeated until the strip is fully loaded.
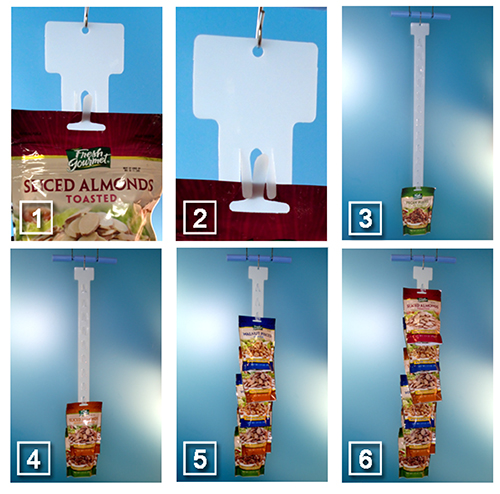
How to Use the “Interlocking Finger Design:
Fig. 1. Push the middle finger forward and through the mounting hole on the package.
Fig. 2. Push the remaining two fingers over the mounting hole on the package.
Loading the Clip Strip®:
Fig. 3. Using the technique described above, load the first package on the lowest mounting position (for 12 packages) or on the second from the bottom mounting position (for 6 packages).
Fig. 4 -6 Repeat until the strip is fully loaded. For 12 packages, use every mounting position. For 6 packages, use every other mounting station.


 Facebook
 LinkedIn
 YouTube